Release 2.2

|
Raphaël Leplae © 2000,2001,2002 Release 2.2 |
News |
About |
Versions |
Features |
Documentation |
Download |
Installation |
P & S |
Licence |
| Back | ||||
| RmscopII installation | ||||
|
Topics
|
||||
|
|
||||
| Overview | ||||
|
RmscopII requires Tcl/Tk version 8.3 or higher plus a number of extra applications depending on the platform. On UNIX platforms, it is assumed that all these extra applications are installed and consist in: If these applications are not installed, follow the links and proceed to their installation. On MSWin and Mac platforms, the RmscopII package contains these applications and therefore there is no need to download them. The RmscopII package features an installer which will be responsible to install and configure the program. The installation is a step-by-step procedure which is described here. |
||||
|
|
||||
| Step1: download RmscopII | ||||
| If you haven't done it yet, download RmscopII now. Select the platform you want RmscopII to run on and once downloaded, go back to this page. | ||||
|
|
||||
| Step2: Tcl/Tk package | ||||
|
If you haven't installed Tcl/Tk version 8.3 or higher, download and install it now.
For UNIX and MSWin, get it from the Scriptics web site. For MacOS 8.x and 9.x, it is recommended to get it from the SourceForge web site. Once downloaded and installed Tcl/Tk, come back to this page. Two notes about Tcl/Tk: 1) Tcl/Tk is quite easy to install, provided basic experience with computers. On MSWin and Mac, an installer will take care of the job. On UNIX platforms, the compilation and installation is straightforward under most operating systems. 2) Most Tcl/Tk scripts written under an earlier Tcl/Tk version are most likely compatible with newer versions. |
||||
|
|
||||
| Step3: start the installer | ||||
|
Go in the RmscopII directory extracted from the archive file you downloaded. On UNIX: Execute the installer by typing on the shell: wish install.tcl
On MSWin:Execute the installer by double clicking the install.tcl icon. 
On Mac:
The installer should start with the following window: Read the text and press the Next button. |
||||
|
|
||||
| Step4: Tcl/Tk check | ||||
|
The installer will check your environment for the Tcl/Tk installation. On UNIX and MSWin, all possible tclsh executables available will be gathered and you'll be asked to select which one to use:
The installer will also check the Tcl/Tk configutation. On MSWin, some libraries need to be copied in a specific directory to provide a proper UNIX-like behaviour. In some cases, it might be necessary to generate the index of some libraries, a necessary step to allow RmscopII (and other Tcl scripts in general) to run properly. This step is not performed during Tcl/Tk installation and therefore will be performed here if necessary. On UNIX systems, that step probably requires root privileges. If you don't have these privileges, ask your system manager to perform the installation.
On Mac, you just need to select the 'Drag and Drop Tclets' application located in the Tcl/Tk installation folder: Once completed, press the Next button. |
||||
|
|
||||
| Step5: programs check and installation | ||||
|
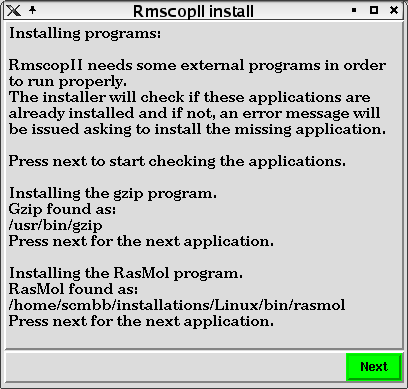
This step will check if the external programs required by RmscopII are installed and on MSWin systems, the installer will provide the option to install them automatically. The programs are RasMol and Gzip On UNIX, if these programs are not found, you will be asked to install them. If both are properly installed, a window like this will be shown:  On MSWin, if the executables are not found, you will be asked in which directory to install them:
On Mac, RmscopII is distributed with the RasMac and Gzip programs. Just ensure that the two folders containing these applications are present in the distribution. Once completed, press the Next button. |
||||
|
|
||||
| Step6: RmscopII | ||||
|
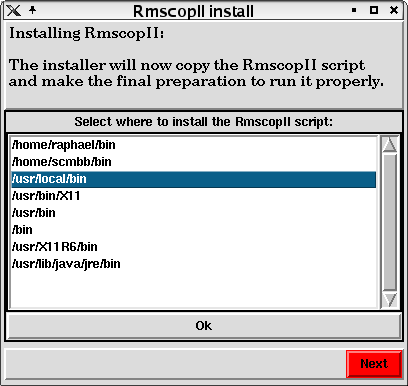
The installer will now install the RmscopII program. On UNIX and MSWin, the installer will propose the pathways defined by the system where applications are automatically found. If RmscopII was not installed previously, select the pathway where it will be installed: 
If RmscopII was already installed, the installer will display its location and you will be asked to select which one needs to be replaced. Ideally, only one copy should be found. If more than one copy is shown, the first one is most likely to be the one used from the shell command line. To know which copy is used from the command line, type in a UNIX shell: which rmscop2.tcl
orwhich rmscop2
If a path is given, select the same path in the installer and click Ok
On Mac, the 'Drag and Drop Tclets' selected in the previous step will be used to generated the RmscopII 'executable'. Click on the proceed button to perform the action:
Shells and browsers interface:
On UNIX systems, a shell script called rmscop2 will be generated in the same directory the RmscopII script is installed.
For UNIX and MSWin, be sure to have write permision for the selected path otherwise ask your system administrator to perform the installation. The rmscop2/rmscop2.bat file installed with the RmscopII Tcl/Tk script is the one to be used to start RmscopII as it will have all the information to run the program properly.
On UNIX, you'll call RmscopII by typing in a shell: rmscop2 <with eventual arguments>
On MSWin, you'll call RmscopII either by typing in a DOS shell: rmscop2 <with eventual arguments>
or by double clicking the batch file icon:
On Mac, you start can start RmscopII by double clicking on the rmscop2 executable icon:
Once completed, press the Next button. |
||||
|
|
||||
| Step7: initialising the preferences | ||||
|
All the preferences can be defined with the RmscopII application, however the installer will ensure that the basic ones will be defined now. If the preferences are already defined from a previous version, this step will not take place. The first question asked is the location of your local copy of PDB. If you don't have a local copy of PDB, just leave the text field blank.
Next, you'll need to select a cache directory that will be used to store temporary files. If you don't have a local copy of PDB, use the same directory as the one defined above. Click Ok when completed. Once completed, press the Next button. |
||||
|
|
||||
| Installation completed | ||||
|
The installation is now complete and RmscopII should be ready to run! See the Documentation page to learn more about RmscopII and how to configure your browser to use RmscopII with some web sites. |
||||
|
|
||||
| Back |
| Last modified on Thu Jan 1 00:00:00 1970 | merlinor @ SourceForge |